Showing posts with label fabric. Show all posts

Tuesday, July 3, 2012

DIY: fabric bunting

my sweet sweet niece's birthday party was the other weekend and she asked me to help with decorations.  I'm really loving bunting right now (well, really for the last few years) so I figured I'd do a tutorial on how to make a fabric bunting (so it will last and she can hang it in her room after the party)

I gathered up some fabric scraps, cut a triangle template out of card stock, grabbed a spool of ribbon (not shown) and pulled out the old sewing machine (also not shown)

ignore the glue gun... he's such a ham trying to get in all my crafting pictures.

using the card stock template, I cut out 18 triangles.  If you want it to look really super awesome and nice, iron your fabric.  I hate ironing so I just let it be wrinkled and called it rustic.
See it's easy to call things rustic or organic just by being lazy!!

pulled out a couple of feet of ribbon and then started folding it in half over the top of the triangles and sewing it.  If you're not a sewing kind of person, I suppose you could give the glue gun a little action.  Just be careful!!  Depending on your fabric and your tolerance for pain, the heat may burn you!!!
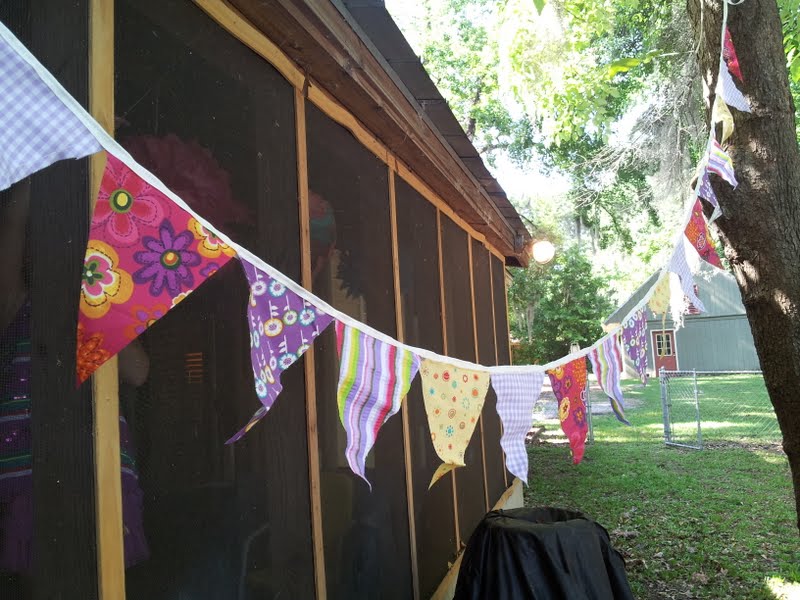
beauty!


Saturday, June 30, 2012

oscar loves fun fabrics!

he's never seen so many fun fabrics all together like this.  It's like someone's having a party!
a fabric party...

honoring Oscar.

stay tuned for what actually happened with this fabric...


Tuesday, April 24, 2012

DIY felt/fabric hair clip


what you need:
felt, fabric, button, barrette or clip, hot glue, pinking shears

cut two squares of felt with pinking shears (I fold the felt in half to cut), then cut one square of fabric slightly smaller.

hot glue the two pieces of felt together and then the fabric on top

hot glue button on top of fabric... I hope you haven't burnt yourself yet!!

hot glue fabric to barrette.

you did it!

I wore this to a St Patty's Day party.  People loved it.

Wednesday, April 18, 2012

flower belt

the sister-in-law asked if I would make belts for the girls' Easter dresses.  I waited around til the last minute, but I got them done.
no sew... just hot glue and fabric.


my sweet niece posing for me at breakfast.
she did a great job of not spilling!
And my sister-in-law did a great job making the rest of the dress... she should blog about these things.

Tuesday, December 13, 2011

DIY Christmas dishtowel


I got crafty last week and decided to put some fabric flowers on a dish towel.
(for fabric flower tutorial, click here.)

so I picked up some scraps of red, green and yellow and made fabric flowers (minus the hot glued buttons)

figured out how I wanted the flowers on the towel and then pinned them in their spot.

sewed buttons on.
this keeps the flowers in place.
you have to make sure that you catch the fabric on your needle so be sure that your flower middles aren't too large (or buttons too small!!)

and done.
something that can be easily done while watching episodes of Intervention you've DVR'ed.
it's a really good show.

Wednesday, November 23, 2011

DIY burlap stockings


too soon???
nahhh.


I decided to hand embroider names on the stockings... 
you know, just to be more difficult and time consuming.
I found a pretty font, printed everybody's name and traced it with a pencil on fabric.

It's not too difficult to make your own template for a stocking.  So I got 3 pieces of card stock, taped them together, drew a big fat stocking and cut. it. out.

hand embroidery time!

using the template, I cute out 8 pieces of burlap and 8 pieces of lining

using pinking shears, I cut squares of the names I embroidered 

I sewed the names on the unfinished stockings, then sewed the stocking together inside out, turned it right side out, put a ribbon on it and...

aw.
aren't we a cute family of stockings!


Thursday, October 27, 2011

DIY flaxseed neck wrap

I made a ton of these last year for Christmas gifts.  My husband has been needing a heating pad so I made him one and decided to make a tutorial out of it.

Cut out 2 pieces of fabric (preferable 100% cotton.  quilting fabrics work great!)
20 inches long, 6 inches wide.

sew right sides together only on the long sides.

fold one short end to look like this and then stitch it together.

measure out a 1 or 1.5 cups of flaxseeds.

carefully pour the flaxseeds into the casing and stitch about 6.5 inches up from short end seam.

pour about 3 - 4 cups of flaxseeds, it should look like this pic.

finish by stitching about 6.5 inches from other end, pouring 1-1.5 cups of flaxseeds into the last section of the wrap.  Finish by folding the end in just like the other end and stitching shut.

finished product.

after about 3 minutes in the microwave (in 90 second increments)
modeled by the mister.

Monday, September 19, 2011

gifts for the kiddies.

My friend Heather has 2 awesome little twin girls who celebrated their 7th birthday with a spa party this past weekend.  Heather asked me to come down and help, so I didn't want to go empty-handed.  

I found this pin and decided to put 2 together (one for each girl).


supplies... rope, suction cups, clothes pins, twin bed sheet, flashlight, ribbon


I sewed the ribbon to each corner of the sheet.

put clips, suction cups and flashlight in the small bag the bed sheet came in and then embroidered a felt piece, resized a pillowcase and turned it into a drawstring bag and put everything into the bag.  Pretty cute!  I made one for each girl.  It was a hit!

Wednesday, September 14, 2011

DIY fabric flowers

After making my fall wreath this past weekend, I decided to post a tutorial on how to make some of the fabric flowers I glued to it.  So here's what I made this afternoon...

supplies... a strip of material (this is about 2.5 inches wide and 11 inches long), fabric scissors, needle and thread, buttons, hot glue gun

fold the strip of material in half longways

begin to sew along the open edge of the strip weaving the needle through allowing the material to bunch up on your needle.

 when you've made it through the whole strip, it should look like this.  pull the thread through and connect the sides so it makes a full circle.

add a few stitches to connect each side, then trim thread.

when you turn it over, it should look like this.

hot glue a button and there's your nifty little flower!

Attach it to a headband, clip, purse, shoe, wreath or whatever you want to add a little snazz to!

Monday, September 12, 2011

weekend craftiness

this weekend, my friend Bethany and I decided to do a Pinterest project.  She's been wanting to make a yarn wrapped wreath and I could definitely use a new fall wreath, so...

here I am wrapping my wreath

this was our progress after a few hours so I went home and we finished our wreaths separately

Bethany's wreath with felt flowers

my wreath with fabric flowers